Binary Search Trees: Handling Deletion
Deletion
We saved deletion for last because, well, it’s just a little tricky. It’s similar to the deletion considerations we had for linked lists. We first find the node to delete. If it exists, we then consider how to handle the blank space left after its deletion. There are three possible cases:
- The node is a leaf node. It has 0 children. Simply remove the node from the tree.
- The node has one child. We splice it out, connecting its parent to its child.
- The node has three children. We follow the following algorithm:
- Find the successor of the node.
- Remove the successor and splice the parent with its right child.
- Save the successor we spliced out and swap it with the node to be deleted.
We are able to splice out the successor from the tree as though it were case #2, a node with only one child. You might worry though: what if the successor has two children? Believe it or not, that’s impossible.
How do we know the successor can’t have a left child? By virtue of its being a successor.
We define the successor S as the smallest element strictly greater than its parent.
- Since this is a binary search tree, left children are always strictly less than their parents, and right children are always strictly greater than their parents.
- If S had a left child (C), that left child would have to be less than S.
- But S is, by definition, the smallest strictly greater element.
So if S “had” a left child, S would not be the successor: C would be.
Before we write any code, let’s visualize the three cases.
Visualization
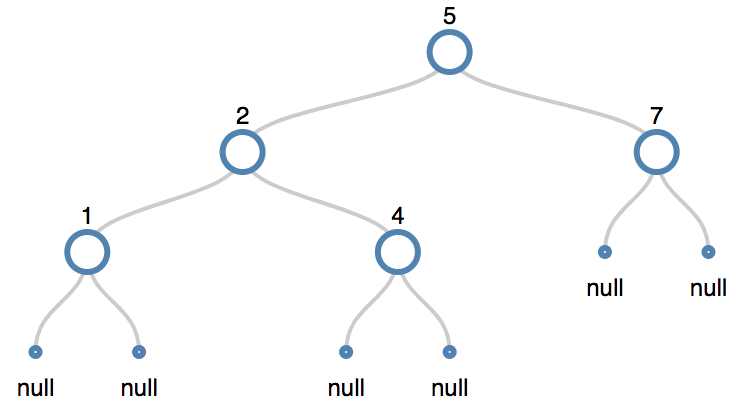
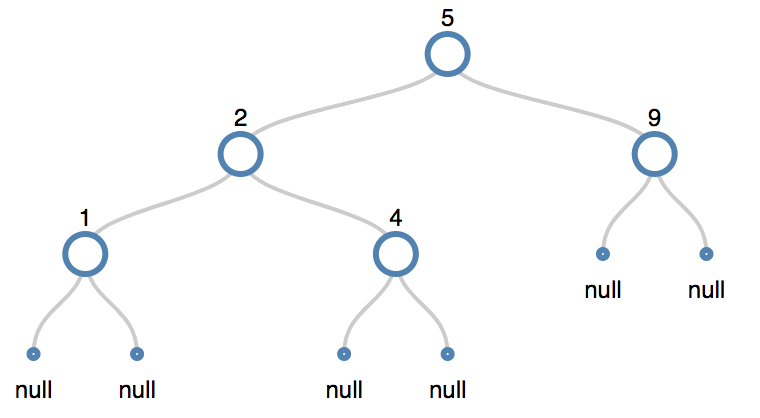
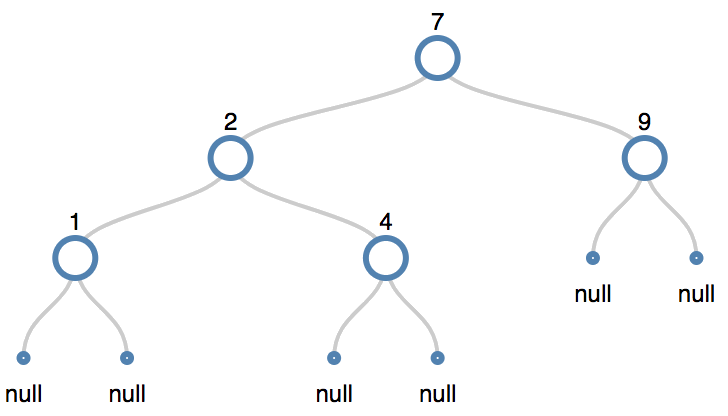
Here’s the before and after for deleting a node with 0, 1, and 2 children.

Delete Node 9: a node with no children

Delete Node 7: a node with one child

Delete Node 5 (the root node) a node with two children

Now let’s write some code.
We need a few helper functions for the tricky cases. One will find the successor for a given node by recursing down the leftmost branch until we reach a leaf node:
function findSuccessor(N) {
  if (!(N && N.right)) {
    return false;
  }
  N = N.right;
  while (N.left !== null) {
    N = N.left;
  }
  return N;
}
If a node does not have a right child, it doesn’t have a successor. If it does have a right child, we find its successor by traversing to the right child and then recursing left until we reach a leaf node.
We’ll also write a simple function to return the number of child nodes given a node, so that we know which of the three deletion cases we’re handling.
function countChildren(node) {
  return (node.right ? 1 : 0) + (node.left ? 1 : 0);
}
We’ll also write one other helper method, findParent. This returns the parent node of a given node. It returns null if the node does not exist in the tree, or if the node is the tree’s parent.
function findParent(tree, node) {
  if (tree == node) {
    return null;
  } // this is the root
  while (tree !== null) {
    if (tree.left == node || tree.right == node) {
      break;
    }
    if (node.data < tree.data) {
      parentNode = tree;
      tree = tree.left;
    } else if (node.data > tree.data) {
      parentNode = tree;
      tree = tree.right;
    }
  }
  return tree ? tree : false;
}
Let’s go ahead and write our delete function now.
Modes 1 and 2 are simple enough.
function deleteNode(tree, value) {
  let parentNode = null;
  while (tree !== null) {
    if (tree.data === value) {
      break;
    }
    if (value < tree.data) {
      parentNode = tree;
      tree = tree.left;
    } else if (value > tree.data) {
      parentNode = tree;
      tree = tree.right;
    }
  }
  if (!tree) {
    return false;
  }
  let childCt = countChildren(tree);
  if (childCt === 0) {
    parentNode.left == tree
      ? (parentNode.left = null)
      : (parentNode.right = null);
  } else if (childCt === 1) {
    let nodeToSplice = tree.left ? tree.left : tree.right;
    parentNode.left === tree
      ? (parentNode.left = nodeToSplice)
      : (parentNode.right = nodeToSplice);
  } else {
    /* two children...sigh */
  }
}
When we search the tree for the value we intend to delete, we keep track of the parentNode (the last node that we visited before going left or right). This way, when we find the target node, we already have the pointer we need for its parent.
We break from the while loop when we find the value, or when tree===null. We check after the loop to see if tree is null. If it is, that means the value doesn’t exist in the tree, so we’re done. Nothing to delete.
If we found the value, we get the count of that node’s children. Then, we execute the three possible deletion cases.
No children? We check to see whether the child is on the left or right side of the parentNode, and then we set that side to null.
One child? We set the variable nodeToSplice equal to whichever child is non-null. Then, we find whether the child is on the left or right side of parentNode and connect nodeToSplice directly. The deleted node now has no references to it.
Two children? Okay, here’s the slightly tricky part.
- Find the successor of the node we wish to delete.
- Copy the successor node.
- Splice out the successor by swapping out its right child with itself.
- Swap out the deleted node with the successor.
We’ll define a method for nodes to swap the value of a given node with a provided value.
node.prototype.swapValue = function (b) {
  this.data = b.data;
};
All right, let’s write the code for case 3.
else {
  // sigh no more
  let succ = findSuccessor(tree);
  let parent = findParent(tree, succ);
  parent.left === succ
    ? (parent.left = succ.right)
    : (parent.right = succ.right);
  tree = tree.swapValue(succ);
  return true;
}
That’s pretty easy, right? We find the successor and the parent of that successor. We determine which side of the parent that the successor lies on. Then, we swap out the deleted node with the successor.
Sidenote: Garbage Collection
It’s important to note that not all languages will free a variable after you have removed a reference to it. Garbage collection is the process of freeing up memory that the program is no longer using but remains allocated as the result of previous operations. When we set the pointer to an item to null, this “orphan” item (which is no longer connected to anything else) will be cleared up by JavaScript’s garbage collector. In some lower-level languages like C, the programmer must free memory manually.
Congratulations
If you’ve finished reading through this and part one of the Binary Search Trees tutorial, you’ve learned yourself some powerful computer science tools. There’s much more to learn: did you know that trees need balancing in order to maintain an optimal shape and performance? Consider if we just added node after node after node without reconfiguring the nodes' orientation. We’d get a tree like this:
Search is no longer O(n*log n). In fact, the performance is not much better than linear search on a linked list. What happened? All that work for nothing?
Patience, young grasshopper. You’ve earned yourself a break from the computer. Have a stretch and some coffee. We’ll cover balanced binary search trees soon enough.