Events and Event Listeners in JavaScript
An example using a
mousemovelistener anddebounceto bring it all together
JavaScript uses an Event Loop to provide concurrency: managing multiple tasks at the same time.
Concurrency (management) is not the same thing as execution (performance). Rather, it’s a means for JavaScript to arrange tasks in an ordered way and execute them singly when there is time available.
Kind of like how your managers tell you what to do but never do it themselves…joking joking.
JavaScript still only has one thread, meaning that it can only do one thing at a time. The Event Loop is a queue of “things to do” when JS is not doing something else.
A queue is an Abstract Data Type that JS implements to handle events. You’re familiar with queues already. Just imagine a line in the grocery store. The first person to get in line is the first person to leave. First in, first out (FIFO). This means that events get handled as close to the time they were added to the queue as possible.
If an event happens in the browser and no one’s listening…
Is it still an event? No.
In the event model, there are emitters and event listeners. Listeners subscribe to emitters, just like you’d subscribe to someone’s Twitter feed. You only get updates from feeds that you’ve subscribed to, and you only get updates when tweets are sent.
Here’s a list of events or “tweets” that elements can send.
Subscribing to an event emitter means registering a handler. Confusing terminology, but this just means passing a function to be called (a good ol' callback!) with the event, whenever the event occurs.
You’ve already seen event listeners. Remember window.onload = function() {}? The function you’re passing to the onload event is the event handler. Since window is global, the event handler is often the entirety of your program’s code. It’s still operating within the evented paradigm.
Adding listeners
Let’s look at an example for a submit button.
<button id="submit">submit</button>
First we select the element. Then we add a listener to it.
const sButton = document.getElementById("submit");
sButton.addEventListener("click", function handleClick() {
  window.alert("You clicked me!");
});
example: Submit
<script type="text/javascript">
const sButton = document.getElementById("submit");
sButton.addEventListener("click", function handleClick() {
  window.alert("You clicked me!");
});
</script>
Sometimes we only want a listener to fire once. If you click the “Submit” button above, it launches an alert dialog each time. Imagine this was a Submit button for a payment processing platform. You wouldn’t want to issue multiple orders if the user kept clicking because the site was slow.
Instead, we can register an event listener that detaches after it fires once (burn after reading) by using the once boolean in the options parameter of addEventListener (Docs):
const oneTime = document.getElementById("submitOnce");
oneTime.addEventListener(
  "click",
  function handleClick() {
    window.alert("You clicked me!");
  },
  { once: true }
);
you only (click) once example: Submit
<script type="text/javascript">
const oneTime = document.getElementById("submitOnce");
oneTime.addEventListener(
  "click",
  function handleClick() {
    window.alert("You clicked me!");
  },
  { once: true }
);
</script>
Try clicking multiple times. The alert fires once and only once.
Removing Listeners
One event can have multiple listeners. We can use removeEventListener (Docs) to remove listeners we have added. removeEventListener requires two parameters to find the listener to remove: the event type, and the callback function registered to the event.
For example, in our button case: sButton.removeEventListener('click', handleClick).
Do not use anonymous functions for event handlers, since it makes removing them tricky. We can’t just call sButton.removeEventListener('click'), for instance.
Okay, it’s a little more complex. Bubbling.
We know that the DOM is a tree of tags. What happens in the tree when there’s a click event on one of its innermost leaves (say, a child div inside a container)?
<div class="container" id="c1">
  <div class="child" id="c1_child1">1</div>
  <div class="child" id="c1_child2">2</div>
  <div class="child" id="c1_child3">3</div>
  <div class="child" id="c1_child4">4</div>
  <div class="child" id="c1_child5">5</div>
  <div class="child" id="c1_child6">6</div>
</div>
const c1 = document.getElementById("c1");
function containerClick(e) {
  console.log(e.path);
  alert("container clicked (id): " + e.target.id);
}
c1.addEventListener("click", containerClick);

function bodyClick(e) {
  if (
    e.target.parentElement.className !== "container" ||
    !["c1", "c2"].includes(e.target.parentElement.id)
  ) {
    return false;
  }
  alert("document-level click event from target: " + e.target.id);
}
document.addEventListener("click", bodyClick);
<style>
  div.container {
    display: flex;
    flex-flow: row;
    justify-content: space-between;
    width: 300px;
    border: 1px solid black;
  }
  div.child {
    flex: auto;
    width: 50px;
    text-align: center;
    border: 1px solid black;
  }
  .child:hover {
    background-color: black;
    color: white;
  }
</style>

<div class="container" id="c1">
  <div class="child" id="c1_child1">1</div>
  <div class="child" id="c1_child2">2</div>
  <div class="child" id="c1_child3">3</div>
  <div class="child" id="c1_child4">4</div>
  <div class="child" id="c1_child5">5</div>
  <div class="child" id="c1_child6">6</div>
</div>

<script>
  const c1 = document.getElementById("c1");
  function containerClick(e) {
    console.log(e.path);
    alert("container clicked (id): " + e.target.id);
  }
  c1.addEventListener("click", containerClick);
  function bodyClick(e) {
    if (
      e.target.parentElement.className !== "container" ||
      !["c1", "c2"].includes(e.target.parentElement.id)
    ) {
      return false;
    }
    alert("document-level click event from target: " + e.target.id);
  }
  document.addEventListener("click", bodyClick);
</script>
try clicking above
Check out the event.path property in the console when you click on a box:
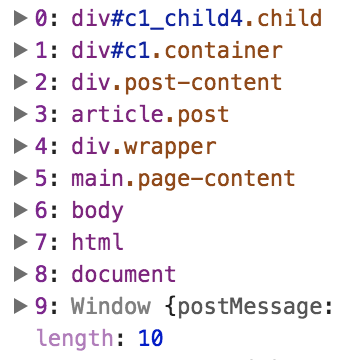
The click event happened on the child element. But then it passed to its parent container, container’s parent, that parent’s parent…all the way up to window, causing the second alert you saw. This is known as bubbling.
This can be a feature and also a source of bugs and confusion. Usually we define click handlers with specificity and would not put a handler on the window itself. But imagine that we did have higher-level click handlers, and we did not want these lower-level clicks to trigger them.
In this case, we can call e.stopPropagation() in our event handler.
<div class="container" id="c2">
  <div class="child" id="c2_child1">1</div>
  <div class="child" id="c2_child2">2</div>
  <div class="child" id="c2_child3">3</div>
  <div class="child" id="c2_child4">4</div>
  <div class="child" id="c2_child5">5</div>
  <div class="child" id="c2_child6">6</div>
</div>
function limitedClick(e) {
  e.stopPropagation();
  alert("container clicked (id): " + e.target.id);
}
const c2 = document.getElementById("c2");
c2.addEventListener("click", limitedClick);

<div class="container" id="c2">
  <div class="child" id="c2_child1">1</div>
  <div class="child" id="c2_child2">2</div>
  <div class="child" id="c2_child3">3</div>
  <div class="child" id="c2_child4">4</div>
  <div class="child" id="c2_child5">5</div>
  <div class="child" id="c2_child6">6</div>
</div>
clicking above only triggers a local handler
function limitedClick(e) {
  e.stopPropagation();
  alert("container clicked (id): " + e.target.id);
}
const c2 = document.getElementById("c2");
c2.addEventListener("click", limitedClick);
It can go the other way: Capture.
Say that we want to prevent clicks on a parent element from propagating downwards toward child element handlers. We can use our previous example of the divs within the container div. What if we want the container element to “capture” the event and prevent it from propagating downwards?
function limitPropagation(e) {
  alert("container clicked (id): " + e.target.id);
}
function childClicked(e) {
  alert("child clicked (id): " + e.target.id);
}
document.querySelectorAll("div#c3 > .child").forEach((child) => {
  child.addEventListener("click", childClicked);
});
const c3 = document.getElementById("c3");
c3.addEventListener("click", limitPropagation, true);
<div class="container" id="c3">
  <div class="child" id="c3_child1">1</div>
  <div class="child" id="c3_child2">2</div>
  <div class="child" id="c3_child3">3</div>
  <div class="child" id="c3_child4">4</div>
  <div class="child" id="c3_child5">5</div>
  <div class="child" id="c3_child6">6</div>
</div>
clicking above only triggers the container handler: none of the child element listeners fire
function limitPropagation(e) {
  e.stopPropagation();
  alert("container clicked (id): " + e.target.id);
}
function childClicked(e) {
  alert("child clicked (id): " + e.target.id);
}
document.querySelectorAll("div#c3 > .child").forEach((child) => {
  child.addEventListener("click", childClicked);
});
const c3 = document.getElementById("c3");
c3.addEventListener("click", limitPropagation, true);
In review.
Bubbling: bottom->up (child->parent)
e.target: the innermost child element that was clicked- to prevent bubbling to parent elements: call
e.preventDefault()in the event handler
Capture: top->down (parent->child)
- to enable: pass
trueinaddEventListener()’s third parameter - to prevent: nothing special required. The default is false.
Event Delegation
Bubbling allows us to take advantage of Event Delegation. Say we want to listen to all the children of a certain div for an event. We can put an event listener on the parent element. When a child div is clicked, the event will bubble up to the parent listener. We can then determine which child element was clicked by looking at e.target.id.
The event target is the element at which the event was directed. In this case, it’s the child div. That target is passed with all the rest of the event information up the chain until it reaches an event handler where it is processed.
Debouncing
It often happens that you are listening to an event which fires many times. mousemove is a good example. This event fires whenever the user moves the mouse, with pixel-level precision. If you call a function each time the mouse is moved, the function will be called thousands of times per seconds and overflow the stack.
What we want to do in these cases is debounce the function. Debouncing simply means wrapping the function in another function that keeps track of how often its child function was called. It only passes through calls when the inner function has not been called for a specified interval.
For instance, if mousemove is calling 50 times per second and your debounce is set to an interval of 500ms, your function will only be called twice, instead of 50 times. Obviously with this decreased granularity, your data will be updated less frequently. However, it’s often possible to make a tradeoff that doesn’t affect performance or user experience. In the case of mousemove, the function call overhead will slow down the app far more than a ms delay between updates.
Underscore is a JS utility library that implements debounce. We can write it for fun though, too.
const debounce = (fn, intervalMs, ...args) => {
  let lastCalled = Date.now();
  return function debounced(args) {
    const rightNow = Date.now();
    if (rightNow - lastCalled > intervalMs) {
      fn.apply(null, [args]);
      lastCalled = Date.now();
    } else {
      // debounce
      // no-op
    }
  };
};

function logger() {
  console.log("test");
}

let padded = debounce(logger, 1000);
setInterval(padded, 1);
Even though we call the function 1000x/second, we only invoke the console.log() 1x/second.
In the case of console.log(), the function takes very little time to execute, so it probably wouldn’t be a big deal to call it a thousand times per second. Imagine you have logic in there, or Math.sin(), and suddenly you’re doing something very expensive very frequently. No! Debounce instead, where the only overhead is grabbing the current timestamp and comparing it with the previous timestamp.
Preventing default behavior with e.preventDefault()
Browsers have native handling for many events, like form submission. We often want to use a form tag, since it makes sense semantically. However, we might want to fire validation code when the user clicks Submit. Or, if it’s a Single Page App, we want to prevent the default page refresh behavior.
default refresh
<form id="default">
<button>submit</button>
</form>

<style>
form {padding:0; margin:0;}
</style>

<form id="default">
clicking this refreshes the page: <button>submit</button>
</form><p />

<form id="prevented">
<button>submit</button>
</form>
override default refresh
<form id="prevented">
  clicking this does not (prevent default and pop an alert):
  <button>submit</button>
</form>

<script>
  function preventRefresh(e) {
    e.preventDefault();
    alert("Ha ha! You can't refresh me!");
  }
  const f = document.getElementById("prevented");
  f.addEventListener("submit", preventRefresh);
  function preventRefresh(e) {
    e.preventDefault();
    alert("Ha ha! You can't refresh me!");
  }
  const f = document.getElementById("prevented");
  f.addEventListener("submit", preventRefresh);
</script>
As always, only scratching the surface
Explore the events list and try experimenting on CodePen. Understanding the event model is not only key to understanding how modern, client-side, interactive JavaScript functions, but also it’s a paradigm used by NodeJS. You can even define your own events (tutorial soon)!